国際会議IEEE CIBCB2021の論文がPublishされました。
はじめに
2021/10/18に国際会議IEEE CIBCB2021の論文がPublishされました。
ieeexplore.ieee.org
T. Kosugi and M. Ohue, "Quantitative Estimate of Protein-Protein Interaction Targeting Drug-likeness," 2021 IEEE Conference on Computational Intelligence in Bioinformatics and Computational Biology (CIBCB), 2021, pp. 1-8, doi: 10.1109/CIBCB49929.2021.9562931.
論文概要
タンパク質間相互作用(PPI)は最近注目されている創薬の標的です。薬となる化合物を設計する際に、その化合物がPPIを標的にできそうかどうかの度合いを定量的にスコア化する手法はありませんでした。そこで、化合物がPPIを標的にできそうかどうかを定量的にスコア化する手法を開発したという内容になっています。
先に、拡張版のほうがPublishされているので、こちらの方がより詳細に議論されている内容が盛り込まれています。
拡張版を紹介した過去記事は以下です。
QEPPIのコード
論文で用いられている、低分子化合物のPPIを標的にできそう度合いをスコア化した「QEPPI」はGitHubで公開しています。 https://github.com/ohuelab/QEPPI
Bio"Pack"athon2021 #10にて発表しました。

はじめに
先日も報告しましたが、最近論文がPublishされました。
Kosugi T, Ohue M. Quantitative Estimate Index for Early-Stage Screening of Compounds Targeting Protein-Protein Interactions. International Journal of Molecular Sciences. 2021; 22(20):10925. https://doi.org/10.3390/ijms222010925
サラッとした説明は昨日も書きました。 blacktanktop.hatenablog.com
今回の研究で、低分子化合物がタンパク質間相互作用(PPI)を標的にできそうかどうかを定量的にスコア化出来るモジュールQEPPIを開発したので、せっかくだからGitHubにあるだけでなく、研究者がさっと使えるように、pip install QEPPIとできるようにPyPIに登録してみました。自身としては初めての試みだったので、色々と調べながらやったことをまとめます。最初は開発モジュールの概要と紹介です。
面白そう!@biopackathon でパッケージの内容と開発手順を発表しませんか?
— もじゃもじゃのほう (Koki Tsuyuzaki) (@antiplastics) October 4, 2021
また、PyPIに登録した後に、@antiplasticsさんからBio"Pack"athon2021 #10へ参加しませんか?ということで誘っていただき、本日発表を行ってきました。
QEPPIとは
タンパク質は、単体で機能するタンパク質もありますが、タンパク質とタンパク質とが相互作用(Protein-Protein interaction (PPI))することで特有の機能をします。(例えば、シグナル伝達・転写因子群による転写など)
近年、医薬品の開発において様々な標的の中で注目されているのがこのPPIです。しかしながら従来の標的(単体のタンパク質のリガンドポケット)とは大きく特性が異なるため、従来の指標ではPPIを標的にできそうかどうかを定量的にスコア化することが困難であることがこれまでの研究で知られており、求められています。
そこで私が所属しているラボで、低分子化合物がPPI(タンパク質間相互作用)を標的にできそうな度合いを定量的にスコア化できるQEPPIを開発しました。
低分子化合物がタンパク質間相互作用(PPI)を標的にできそうかどうかを定量的にスコア化した「QEPPI」がを公開しています。https://t.co/XOcSuf57Js
— くろたんく@FullyVaccinated (@black_tank_top) October 4, 2021
Colabでお手軽にためせるので、お手元のPPIを標的としそうな化合物のSMILES を入力してQEPPIスコアを計算してみて下さい。https://t.co/XOcSuf57Js https://t.co/yw6uXsxEF1
開発について
GitHub上での開発
公開しているコードは、QEPPIを計算するモジュールのみですが、実際の開発では、学習(正確にいうと学習ではないので学習みたいな)コードも書いています。基本となる、QEDという従来医薬品における定量指標の論文に記述されている数式をベースにコードに起こして、作成しました。最終的に推論(これまた、正確に言うと推論ではないが推論みたいな)コードを公開したという経緯になります。
PyPIへの登録
- Package化に必要なモジュールのインストール
- Packageソースの作成
- init.pyの作成
- メインソースの作成
- MANIFEST.inの作成
- setup.pyの作成
- README.mdの作成 1 LICENSEの作成
- Twineを使ってPyPIに登録
事前準備
基本的に、パッケージ化に必要なsetuptoolsとwheel はinstall済みなことが多いですが、upgradeを行います。また後述しますがPyPIのupload用にtwineというモジュールを使うので、こちらもインストールしておきます。(モジュールの実行環境とは別にPyPIへのupload用にpyenvなどで環境を切り分けてから実行したほうが良いかと思います。)
python3 -m pip install --upgrade setuptools wheel twine
Packageソースの作成
本題のPyPIの登録についてです。PyPIの登録は今回初めて行いました。ドキュメントはあるものの、ちょっとよくわからないというのが正直なところでした。なのでいろんなサイトを参考にしてやってみました。 基本いくつかのステップに分けられるのでステップに分けて説明します。
# QEPPIの例(本物とちょっと違うけど)
├── setup.py
├── MANIFEST.in
├── QEPPI  ← ここをモジュール名と合わせておくと吉
│   ├── __init__.py
│   ├── QEPPI.py
│   ├── constant.py
│   ├── util.py
│   └── version.py
├── README.md
├── LICENSE
- setup.py : パッケージ作成情報を記述する。(詳細は後述)
- MANIFEST.in : パッケージに追加、または除外するファイルを記述する。 例えばrequirements.txtなど。 LICENSE, README.md setup.pyなどは指定せずとも勝手にパッケージングされます。取り除きたい場合はexcludeであえて含ませないといったことが出来ます。また、setup.pyの仕様でrequirements.txtを使う場合はMANIFEST.in に書かないと怒られますので必ず書きましょう。
# MANIFEST.in
include *.md
exclude README.md
include requirements.txt
- init.py : パッケージ基本情報を記述。 例えば以下のような感じ。 一番上のimportが結構重要です。
# __init__.py
from .<ファイル> import *  ← この行ポイント
__copyright__    = "Copyright (C) 2021 balcktanktop"
__version__      =  "0.1.10"
__license__      = "MIT"
__author__       = "くろたんく"
__author_email__ = "くろたんく@gmail.com"
__url__          = "http://github.com/blacktanktop/repository"
- setup.py
一番肝心のsetup.pyです。まず例です。
from setuptools import setup

exec(open("QEPPI/version.py").read())

with open("README.md", "r", encoding="utf-8") as fh:
    long_description = fh.read()

setup(
    name="QEPPI",
    version=__version__,
    author="blacktanktop,
    author_email="くろたんく@gmail.com",
    description="Calculation module of QEPPI",
    long_description=long_description,
    long_description_content_type="text/markdown",
    url="https://github.com/ohuelab/QEPPI/",
    license="MIT",
    packages=["QEPPI"],
    install_requires=[
        "rdkit-pypi>=2021.3.1.5",
        "numpy>=1.19.5",
        "pandas>=1.1.5",
    ],
    classifiers=[
        "Programming Language :: Python :: 3.7",
        "Programming Language :: Python :: 3.8",
        "License :: OSI Approved :: MIT License",
        "Operating System :: OS Independent",
        "Topic :: Scientific/Engineering :: Chemistry",
        "Topic :: Scientific/Engineering :: Bio-Informatics",
    ],
)
name : パッケージ名称
version : バージョン
author : 著作者名
author_email : 著作者のメールアドレス
description : 簡単な説明
long_description : 詳細の説明 後述しますがREADME.mdファイルの内容をそのまま書き込むこともできます。
url : パッケージのWeb page GitHubのリポジトリURLなど
license : パッケージのライセンス(MITなど)
packages : モジュールリスト (Mainソースのディレクトリ名を指定する)
install_requires : Dependencyのあるパッケージ
classifiers : 分類語のリスト 実際にPyPIで分類リストがあるのでそれを指定する。
冒頭の2行は
exec(open("QEPPI/version.py").read())- とするとverion.pyに書いてあるversion=0.1.10を読み込めるので、バージョンを変数で管理するためです。
with open("README.md", "r", encoding="utf-8") as fh:
    long_description = fh.read()
- long_descriptionという変数にREADME.mdのテキストを突っ込むことで、 PyPIに登録したときの画面をREADME.mdと同じにするための方法です。
また、install_requiresをrequirements.txtで指定したい場合は、
def _requires_from_file(filename):
    return open(filename).read().splitlines()
のような関数を作っておいて
install_requires=_requires_from_file("requirements.txt")
などとします。
ただ、最近ではsetup.pyはシンプルにして、setup.cfgというconfigファイルに全部設定を書くというのが主流だそうです。 参考までに例を上げておきます。(マダよくわかってないがiniファイルっぽい作りのものでsetup()の括弧内のものを別のまとめ方でもできるよということです。)
[metadata]
name = package_name
version = attr: src.VERSION
description = short package description
long_description = file: README.md
keywords = foo, bar
license = MIT License
classifiers =
    Programming Language :: Python :: 3.7

[options]
zip_safe = False
include_package_data = True
packages = find:
scripts =
  bin/first.py
  bin/second.py
install_requires =
  pandas
  numpy; python_version == "3.7"

[options.package_data]
* = *.md
さて、これで下準備ができました!あとはビルドしてPyPIにupするだけです。
ちょっとテスト
ここまで出来ていると、以下のコマンドでinstallテストが可能です。
python setup.py install
pip listすればinstallが確認出来ると思います。
また、versionやその他の定義変数を設定している場合は以下のような確認もできます。
>>> import QEPPI
>>> QEPPI.__version__
'0.1.10'
ビルドの準備
ビルドするには、setuptoolsでビルドします。 setup.pyがある階層で以下のコマンドを叩くと完了です。
python setup.py sdist bdist_wheel
├── setup.py
├── MANIFEST.in
├── Makefile
├── QEPPI
│   ├── QEPPI.py
│   ├── __init__.py
│   ├── constant.py
│   ├── util.py
│   └── version.py
├── QEPPI.egg-info
│   ├── PKG-INFO
│   ├── SOURCES.txt
│   ├── dependency_links.txt
│   ├── requires.txt
│   └── top_level.txt
├── build
│   ├── bdist.macosx-10.12-x86_64
│   └── lib
│       └── QEPPI
│           ├── QEPPI.py
│           ├── __init__.py
│           ├── constant.py
│           ├── util.py
│           └── version.py
├── dist
│   ├── QEPPI-0.1.10-py3-none-any.whl
│   └── QEPPI-0.1.10.tar.gz
├── README.md
├── LICENSE
最初のディレクトリと比べると、.egg-infoとbuild/とdist/ が作られます。最終的に登録するのはdistの中身になります。
PyPIへのupload
早速登録したいのですが、まずいわゆるユーザー登録の必要があります。そして、PyPIにはテスト用の環境と、本番用の環境があります。
また、setup.pyのコマンドでupしてもいいのですが、今回はtwineを使います。(最初にインストールした) github.com
また、README.mdをそのままlong descriptionに設定している場合は、本当に今のREADME.mdで良いかをしっかりと検討して、やりきってからupに進んだほうが良いです。というのもTest.PyPIもPyPIもupのやり直しができません。versionを同じままで、descriptionだけ変えたいということができない(と思う)ので気をつけましょう。基本的に変更はversionを少しでもいいから上げる(1.0.0なら1.0.1とか) 削除しても同じ名前だと記録が残っているので、削除してもダメです。
Test.PyPI (練習用)へのupload
README.mdのチェックが終わったら、upします。 以下のコマンドでTest.PyPIにup出来ます
twine upload --repository-url https://test.pypi.org/legacy/ dist/*
パスが求められるのでユーザー登録したときのusernameとpassを入れましょう。
upが終わったら、出力されるURLを見に行きましょう
こんな感じなので、
pip install -i https://test.pypi.org/simple/ QEPPI
のようにコマンドを叩くと、ローカル環境にインストールされます。 インストール後に、適宜問題が無いかチェックします。必要があれば、テストコードを走らせる等しましょう。
PyPI (本番)へのupload
ここまで来てしまえば、同じ様に本番にupします。
twine upload --repository-url https://pypi.org/legacy/ dist/*
こちらでも、パスが求められるのでユーザー登録したときのusernameとpassを入れましょう。
upが終わったら、出力されるURLを見に行きましょう。
こんな感じになって、PyPI登録出来ました!!!
あとは、適当な環境で
pip install QEPPI
のようにインストールをすると、依存関係もインストールされるのが確認できます。

Makefileによるタスクフロー化
これからバージョンを上げていくときに便利なようにMakefileを使って、タスク化してしまいましょう。
その前に、毎回、パスを入れるのも面倒なのとセキュリティ的にもちょっと微妙なので、API tokenを使って登録出来るようにします。アカウント設定の下の方から取得出来るのでそれぞれ取得して下さい。
そうしたら、~/.pypircを作って下さい。中身は以下のようにしましょう。usernameをtokenとするとpassはAPI tokenと認識するようです。(ちなみにここに、自分のusernameとpassを書いてもよいがtokenのほうが良いですね)
[distutils]
index-servers =
  pypi
  testpypi

[pypi]
username = __token__
password = pypi-~~~tokenを入れる

[testpypi]
username = __token__
password = pypi-~~~tokenを入れる
これで設定はバッチリです。
では、話を戻して、Makefikeの例を見ていきましょう。
私はコマンドを手で叩くのが一周したら、必ずこの様なMakefileを書きます。Rakeでも良いですが環境を作る必要がないのでMakefileをタスク実行ツールととして使っています。
make clean : 一度、Buildするとegg.Infoとかdistの前のバージョンが残ったままになってしまいます。なので、まずcleanで過去のパッケージを消します。単純にrm -rfで消します。
make build : ビルドしてupするためのdistを作ります。
make test-deploy : Test.PyPIにupします。
make deploy : PyPIにupします。
この様にMakefileでタスク化しておくとしばらく経ってからのバージョン変更の際にも、記憶に優しく実行できますね。
あとはパッケージをUpdateしていきましょう!
ポイント
PyPIのdescriptionとGitHubのREADME.mdが一致しないとなんか気持ち悪いですが、PyPIは過去のバージョン、GitHubがdevelopバージョンと割り切って、GitHubで開発を進めて、ある程度機能が備わったらPyPIにバージョンを上げたものをuploadといった様にするのが良いかと思います。
今回の内容をまとめたスライド
研究概要 + PyPI登録に関連する資料を作成しました。 Speaker Deckにupしてありますので興味ある方はそちらも御覧ください。
終わりに
今回は、自分が開発したパッケージをpip install QEPPIのようにインストール出来るようにするために、PyPIにuploadする手順をまとめました。初めて行った作業で、まだわかっていない部分もありますが、だいたいこの手順で行えばそこまで問題は起きないかなと思います。
今回改めて、普段何気なく使っているOSSツールがとても大変な労力をかけてやられているのだと実感しました。
また、質問を受けて思ったのは、 * Condaでの公開方法との違い * PyPIへuploadするときのテスト関係 * プラットフォーム別のバイナリーデータについて ここらへんは、今後、きちんと調べてきたいと思います。
資料作って、話し、質問を受けるということをするととても勉強になり、参加してよかったなと思いました。
参考にしたブログ等
公式以外で参考にしたものは以下です。ありがとうございました。
参考文献
導入でPPIの説明に出てきた内容の文献はこちらです。
Shin, W.-H.; Kumazawa, K.; Imai, K.; Hirokawa, T.; Kihara, D. Current challenges and opportunities in designing protein–protein interaction targeted drugs. Adv. Appl. Bioinform. Chem. 2020, 13, 11–25, doi:10.2147/AABC.S235542.
Morelli, X.; Bourgeas, R.; Roche, P. Chemical and structural lessons from recent successes in protein-protein interaction inhibition (2P2I). Curr. Opin. Chem. Biol. 2011, 15, 475–481, doi:10.1016/j.cbpa.2011.05.024.
Bickerton, G.R.; Paolini, G. V.; Besnard, J.; Muresan, S.; Hopkins, A.L. Quantifying the chemical beauty of drugs. Nat. Chem. 2012, 4, 90–98, doi:10.1038/nchem.1243.
Jumper, J.; Evans, R.; Pritzel, A.; Green, T.; Figurnov, M.; Ronneberger, O.; Tunyasuvunakool, K.; Bates, R.; Žídek, A.; Potapenko, A.; et al. Highly accurate protein structure prediction with AlphaFold. Nature 2021, doi:10.1038/s41586-021-03819-2.
QEPPI論文がPublishされました。
はじめに
2021/10/10に自身がこれまで取り組んできた研究成果をまとめた論文がInternational Journal of Molecular Sciences誌に掲載されました。
Kosugi T, Ohue M. Quantitative Estimate Index for Early-Stage Screening of Compounds Targeting Protein-Protein Interactions. International Journal of Molecular Sciences. 2021; 22(20):10925. https://doi.org/10.3390/ijms222010925
論文概要
タンパク質間相互作用(PPI)は最近注目されている創薬の標的です。薬となる化合物を設計する際に、その化合物がPPIを標的にできそうかどうかの度合いを定量的にスコア化する手法はありませんでした。そこで、化合物がPPIを標的にできそうかどうかを定量的にスコア化する手法を開発したという内容になっています。
簡単に論文をまとめたスライド
@antiplasticsさんからBio"Pack"athon2021 #10へ参加しませんか?ということで誘っていただいたので研究概要 + PyPI登録に関連する資料を作成しました。Speaker Deckにupしてありますので興味ある方はそちらも御覧ください。
QEPPIのコード
論文で用いられている、低分子化合物のPPIを標的にできそう度合いをスコア化した「QEPPI」はGitHubで公開しています。 https://github.com/ohuelab/QEPPI
QEPPIのロゴ
今回はQEPPIをイメージしやすいように、ロゴを作成しました。

Graphvizを用いたニューラルネットのGraph構造の作図
ニューラルネットのGraphをサクッと作りたく、Graphvizで簡単にできたのでその紹介。
細かい設定を色々試したかったので、その結果をGistにupしてお来ました。
かなり細かい設定ができるので、コードからどこをいじると何が変化するかっていうのを理解しながら適宜調整すると良いかと思います。
ポイントは、
* バックグラウンドを透明にする bgcolor="transparent"
* ノード群が四角で囲われるのでその線を透明にするsubgraph cluster内での、color="transparent";
この2つをやっておけばpngで背景透明でいい感じに出力できます。(逆にそれぞれ色を設定してやってみると、どういうことかわかります)
でこのコードをColabでも自身の環境でもいいので叩くと、

こんな感じのものが出来上がります。(実際に出来上がるのはもっと高画質です。)
Weekly Life Science Informatics News 始めました。
機械学習界隈ではRevueを使って発信している人が幾人かいるのですが、生命情報科学界隈ではあまりいない(見たこと無い)し、Twitterの機能の一部にRevueを使ったニュースレター機能が出来たので少しやりやすくなったということもあって、最新の動向を追う目的で、ふと思い立って、Weekly Life Science Informatics Newsという名称でニュースレターを始めました。
バイオインフォマティクスとケモインフォマティクスをイメージして、こんなロゴまで作ってしまったので、ちゃんと続けないと。まぁとはいってもテンプレートで簡単に作れるもので作ったので大した手間ではなかったです。(むしろ外枠のWeekly Life Science Informatics News を円形に囲むほうが大変だった・・・)

第1回はAMED-BINDS講習会が開催やAlphaFold2のまとめサイトについての紹介。その他いくつかの論文について書きました。無料で購読できますSubscribeするとメールでお知らせが来ます。「編集作業を応援したい!」と思って頂けたらぜひスポンサーをお願い致します。
手探りですが、今後しばらく続けて最近の動向をおさえる様にしようと思っています。
9/13週のまとめ。AMED-BINDS講習会が開催。ペプチド-タンパク質間相互作用予測関連の深層学習フレームワークやProtein Sequence Design関連の論文は要チェック#weeklyinformatics
— くろたんく@激しく多忙 (@black_tank_top) 2021年9月21日
🔥 Hot off the press:
"Weekly Life Science Informatics News Issue #1"https://t.co/HSrHAYsLzp @revueより
2回目ワクチン接種完了
ようやく2回目のワクチン接種完了
そんなわけないけど、なんか高揚感があるような感じで何かを感じる(気分の問題。)
抗体価の上昇をなんとなく感じる(そんなわけないか)
— くろたんく@激しく多忙 (@black_tank_top) 2021年9月15日
明日は具合悪くなるだろうけど、横になりながら本くらい読めたり、NETFLIXとか見られるくらいの元気だけは欲しいな。
今日から10-14日くらい経てばFully Vaccinatedってことで例のアイコンをつけたい。
SELFIES, a new molecular representation method
I was thinking of writing my own explanation of SELFIES, partly because I couldn't find a detailed Japanese explanation of its grammar anywhere, and partly because I wanted to use it for my own research and wanted to deepen my understanding. Then, Mario Krenn, the first author, contacted me and said I could write about SELFIES on my blog. From there, I reread the paper a bit, examined the differences in behavior between the current version of SELFIES and this version, and came to an almost complete understanding of the grammar, which I wrote about SELFIES in Japanese in my blog.
And also I participated in the SELFIES Workshop on August 13, 2021.
accelerationconsortium.substack.com
Some of the participants asked me if there was an English version equivalent to the Japanese explanation I wrote. So I have translated it back into English.
Introduction
This article is an introduction to SELFIES, a new molecular representation presented in this paper, developed in the lab of Prof. It was developed in Prof. Aspuru-Guzik's lab, who is famous for creating Chemical VAEs. (It will be up on arXiv in 2019)
Original title: Self-referencing embedded strings (SELFIES): A 100% robust molecular string representation
Authors: Mario Krenn, Florian Häse, AkshatKumar Nigam, Pascal Friederich, Alan Aspuru-Guzik
Journal: Machine Learning: Science and Technology
Publish: 28 October 2020
doi: 10.1088/2632-2153/aba947
I have written this paper for brevity and clarity, based not only on the paper, but also on my understanding of the behavior I have seen in running the code and the implementation, so please refer to the paper and the implementation if you are interested.
If you are interested, please refer to the papers and implementations. Also, the contents of this article are based on the latest version, v1.0.4.
[Note] Since the development has been going on since the paper was published, there are some discrepancies between the description in the paper and the output in v1.0.4. (I got stuck there...).
Outline of the paper
SMILES is widely used as a standard string molecular representation for chemical compounds, but when SMILES is used for input and output of generative models, there is a problem that a large part of the molecules do not correspond to valid molecules. The reason for this is that the generated strings are syntactically invalid or violate basic chemical rules such as the maximum number of valence bonds between atoms. The authors seem to have developed SELFIES to solve these problems.
Even a completely random string of SELFIES can represent a correct molecular graph. To achieve this, the authors developed SELFIES using ideas from theoretical computer science, namely formal grammar and formal automatons (formal Chomsky type-2 grammar (or analogously, a finite state automata)). In the paper, describe the development of SELFIES.
In the paper, we tried VAE and GAN with SELFIES and SMILES, and the results show that the output is fully valid and the model can generate orders of magnitude more molecules with SELFIES than with SMILES. (Table 1, Figure 5, Figure 6)
The great thing about SELFIES (in my opinion)
Instead of using strings to indicate the beginning and end of Rings and Branches, SELFIES represents Rings and Branches by their length, and avoids syntactic problems by interpreting the symbols following the Ring and Branch symbols as numbers representing their length (Index Symbols, to be discussed later).
Coding considering bond valence. It is designed to ensure that the physical constraint that C=C=C is possible (three carbons connected by a double bond), but F=O=F is impossible (F can only have one bond and O can only have two bonds) is met.
I have tried VAEs of Mol to SELFIES and Mol to SMILES using graph neural networks myself, and the generation of both SMILES and SELFIES works well, but most of the SMILES are not valid (several percent), while 100% of the SELFIES are valid. However, with SMILES, most of them are not valid (a few percent), but with SELFIES, they are 100% valid. (The details of the results of the test will be discussed another time.
Other results using SELFIES
Based on the results in the above paper, I believe that SELFIES will perform well in the task of inverse design of functional molecules based on deep generative models and genetic algorithms. We have already obtained a number of results using SELFIES.
- Inverse design using genetic algorithms
- Conversion from molecular images to SMILES
- Conversion from SMILES to IUPAC-name
The grammar of SELFIES (main topic)
About SMILES
If you don't know anything about SMILES, this article won't make any sense at all, but I'm going to assume that you do know something about SMILES.
If you don't know what SMILES is, I suggest you read py4chemoinformatics first to build up your domain knowledge, including how to use RDKit.
It's English version repository (original repository is here)
MDMA Explained (just look at it for now)
Now, let's start the explanation.
First of all, the SMILES of MDMA (3,4-Methylenedioxymethamphetamine), which appears in Figure 1 of the paper, is written as it is. MolFromSmiles("CNC(C)CC1=CC=CC=C2C(=C1)OCO2") in RDKit, it will be drawn as follows.

So, the SMILES of MDMA is CNC(C)CC1=CC=C2C(=C1)OCO2.
On the other hand, what happens to the SELFIES of MDMA?
import selfies as sf
sf.encoder("CNC(C)CC1=CC=C2C(=C1)OCO2")

# [C][N][C][Branch1_1][C][C][C][C][=C][C][=C][C][Branch1_2][Ring2][=C][Ring1][Branch1_2][O][C][O][Ring1][Branch1_2]
At this point, let's close the paper, because it's not the same as the expression of SELFIES in the paper (I know that the result is the same (it's just that this is how it was expressed in the version at the time)).
If you read Figure 2 properly, you may be able to understand it, but at first glance it doesn't make sense. First of all, the number of "C" seems to have increased compared to the original SMILES. It's hard to understand with MDMA, so I'll use a simpler example.
In order to understand the grammar of SELFIES, you need to understand Atomic Symbols, Index Symbols, Branch Symbols, and Ring Symbols. If you can understand these, you should have no problem.
Atomic Symbols
Let's start with an appropriate example.
sf.encoder("C=CC#C[13C]")
# [C][=C][C][#C][13Cexpl]

sf.encoder("CF")
# [C][F]

sf.encoder("COC=O")
# [C][O][C][=O]
Atomic Symbols are composed of a bond type, which represents the bond type, and an atom type, which is represented by SMILES and denoted by .
The bond type is the same as in SMILES.
- single bond : '' (empty)
- double bond : '='
- Triple bond type: '#'
- Geometric isomerism: '/' and '\\'.
Atom type is the same as SMILES. However, if you explicitly use brackets (), such as [13C] or [C@@H], the character expl is added. Ions are also possible.
One of the reasons for the high Validity of SELFIES is the Decoder. Let's look at an example.
sf.encoder("COC=O")
# [C][O][C][=O]

sf.decoder("[C][O][C][=O]")
# COC=O

# Even if you ignore bond valence and write an appropriate compound, it will only be decoded to the part that is possible.
sf.decoder("[C][O][=C][#O][C][F]")
# COC=O
If the bond constraints of the previous or current atom are violated in this way, the bond multiplicity is designed to be reduced (minimally) so that all bond constraints are satisfied. (There is a description that gives the valence here: XXXXX_bond_constraints)
So far, I think you can understand the case of a simple linear chain. Next, I will explain the Branch Symbols and Ring Symbols, but before that, I would like to explain the Index Symbols, which are necessary for the explanation of Branch Symbols and Ring Symbols. This is because the Index Symbols, which are essential for the explanation of Branch Symbols and Ring Symbols, need to be explained first.
Index Symbols
This is where I personally got very stuck (and didn't notice it), but as I mentioned above, here are the key points.
- The beginning and end of a ring and branch in strings, SELFIES represents rings and branches by their length.
- After a ring and branch symbol, the subsequent symbol is interpreted as a number that stands for a length.
What this means is that you can think of index as a string that represents an atom, branching structure, or ring structure.
You can find the description here.
The table below shows the results.
| Index | Symbols |
|---|---|
| 0 | [C] |
| 1 | [Ring1] |
| 2 | [Ring2] |
| 3 | [Branch1_1] |
| 4 | [Branch1_2] |
| 5 | [Branch1_3] |
| 6 | [Branch2_1] |
| 7 | [Branch2_2] |
| 8 | [Branch2_3] |
| 9 | [O] |
| 10 | [N] |
| 11 | [=N] |
| 12 | [=C] |
| 13 | [#C] |
| 14 | [S] |
| 15 | [P] |
The symbol 𝑄 is used a lot in the paper, and this is what it means. Thinking in terms of hexadecimal numbers, 𝑄 can be expressed as 𝑄 = (idx(𝑠1)×162)+(idx(𝑠2)×16)+idx(𝑠3).
To see what I mean, let's take a look at the Branch Symbols example.
Branch Symbols
Now that we can use Index Symbols to calculate 𝑄, let's look at an example with a branch structure.
# SO4
sf.encoder("S(=O)(=O)([O-])[O-]")
# [S][Branch1_2][C][=O][Branch1_2][C][=O][Branch1_1][C][O-expl][O-expl]
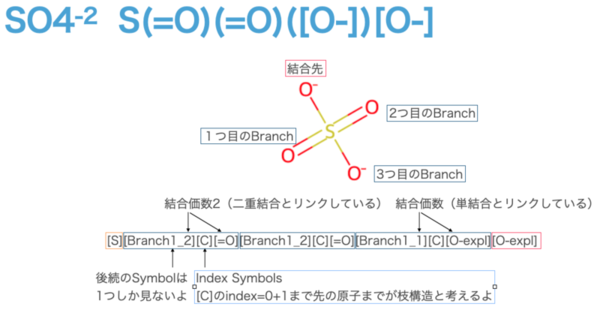
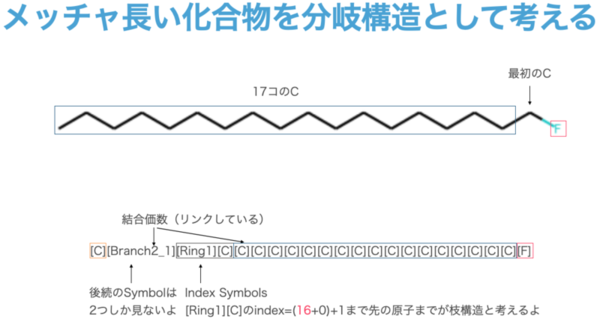
First, Branch Symbols has the pattern [Branch{L}_{M}]. The L on the left is the range {1, 2, 3}, and the number means how many subsequent letters are to be seen as Index Symbols. 1 means one letter, 2 means two letters, and so on. In this example, we are not looking at the second letter, so we need to assume that the second letter is a long chain, for example, "C" is more than 17 characters long (more on this later).
Next, the M on the right side of [Branch{L}_{M}] is the range {1, 2, 3}. This shows the bonding pattern with the atoms after the Index Symbols. 1 for a single bond, 2 for a double bond, 3 for a triple bond, and so on. Of course, the target Atom Symbols are linked to each other. By the way, if either one of them is not satisfied, the lesser one will be preferred, because the bond multiplicity is designed to be reduced (minimally) so that all bond constraints are satisfied if the bond constraints of the previous or current atom are violated.
If we consider the case of [Branch1_2] using SO4 as an example, only [C] will be processed as an Index Symbol, since subsequent Index Symbols will only see one character. In the table shown above, [C] has an index of 0. It is important to note that the branching structure is calculated from the Index Symbols, 𝑄, and is considered as a branching structure up to 𝑄+1 th symbol. In this case, all of them are [C], so the branch structure is up to the first letter after that ([=O] or [O-expl]). It is easy to understand that Atomic Symbols, without Branch Symbols, are directly connected to each other. (In this example, the head and tail are directly connected, and the other three are branch structures (orange and pink symbols).
(In this example, the head and tail are directly connected, and the other three are branching structures. (Up to Branch 3 is possible, so something as long as 16 ** 3 is possible.
Ring Symbols
Now that you understand it, Ring Symbols is very easy.
There are two main patterns of Ring Symbols: [Ring] and [ExplRing], where L is {1, 2, 3} and the number of subsequent letters are considered as Index Symbols or not. Then, it calculates 𝑄 in the same way as Branch Symbols, and combines it with the 𝑄+1 th previous Atomic Symbols to form a ring structure.
Well, let's look at an example. Everyone's favorite :) Benzene rings are easy to understand.
sf.encoder("C1=CC=CC=C1")
# [C][=C][C][=C][C][=C][Ring1][Branch1_2]
#  ↑   ↑  ↑   ↑  ↑   ↑
#  5   4  3   2  1   0
It is important to note that after [Ring1] are Index Symbols. You see [Branch1_2], but this is just what we think of as an index. Since it is [Ring1], only one character after it is considered as Index Symbols. Since [Branch1_2] has 𝑄 = 4 in the Index Symbols table, the first Atomic Symbols is [C], which is the 𝑄+1st, In other words, the five previous Atomic Symbol is the first [C], which is joined to form a ring structure.
Also, [ExplRing] about this pattern is easier to understand if you think of it as another representation of a benzene ring. The benzene ring can be written as C=1C=CC=CC=1 in SMILES. If we use this as SELFIES, we get the following.
sf.encoder("C=1C=CC=CC=1")
# [C][C][=C][C][=C][C][Expl=Ring1][Branch1_2]
#  ↑   ↑  ↑  ↑   ↑  ↑
#  5   4  3  2   1  0
The basic idea is the same, but since [Expl=Ring1] is used, the bond type should be "=" when creating a ring structure with Atomic Symbols, which is the standard just before Ring Symbols. (You can imagine that =1 at the end of SMILES corresponds to [Expl=Ring1].
Extra for "Ring" use cases
Ring Symbols are a little more interesting, and triple bonds such as acetylene can be written with Ring Symbols. (In short, if you create a ring structure with a double bond in a part that already has a single bond, it will become a triple bond.
sf.decoder("[C][C][Expl=Ring1][C]")
# C#C
MDMA Description
If you can understand this far, you will have a complete understanding of MDMA as shown earlier.
import selfies as sf
sf.encoder("CNC(C)CC1=CC=C2C(=C1)OCO2")

# [C][N][C][Branch1_1][C][C][C][C][=C][C][=C][C][Branch1_2][Ring2][=C][Ring1][Branch1_2][O][C][O][Ring1][Branch1_2]

It's a little difficult to understand because I couldn't color-code it well, but if you use all the assumptions you've made so far, you can understand it without any problems.
The difficult part is around the middle, [Branch1_2][Ring2][=C][Ring1][Branch1_2], where the branch structure is connected by a ring structure, which is quite difficult to understand, but if you think about it a bit, you can understand it.
Colab
This time, I used Colab because I wanted to run it in my hand so that I could do some thinking and error. It is available for viewing, so you can probably modify it in your own way or download it and try it out.
Summary
I hope that you now have an almost complete understanding of the syntax of SELFIES.
So why do SELFIES written in this format work so well for generative models such as VAEs and GANs, unlike SMILES? I think it is very important that SELFIES represents 100% valid compounds even if they are randomly sorted, that it is super robust, and that as a result, there are no invalid regions in the latent space.
I am wondering if I can use it successfully in my own research.
References
SELFIES GitHub github.com
SELFIES extensive blog post aspuru.substack.com
SELFIES Official Document selfies.readthedocs.io